There are two special moments in darkroom work: the first is when you unroll the wet film from the black developing tank and see the negatives, and the second is when your first full size print comes to life in the developing tray and you see the image in the red light.
It was a hot and humid day in Durban and I loaded the film into the reels and developing tank in a small windowless and airless room under the steps at home. Then I set about the chemistry of mixing the DF11 Ilford film developer, a homemade stop with vinegar and the Ilford fixer. The temperature of the developer is critical and fortunately Ivor Ginsberg had sent me a thermometer that fitted in the irrigation spout of the developing tank.
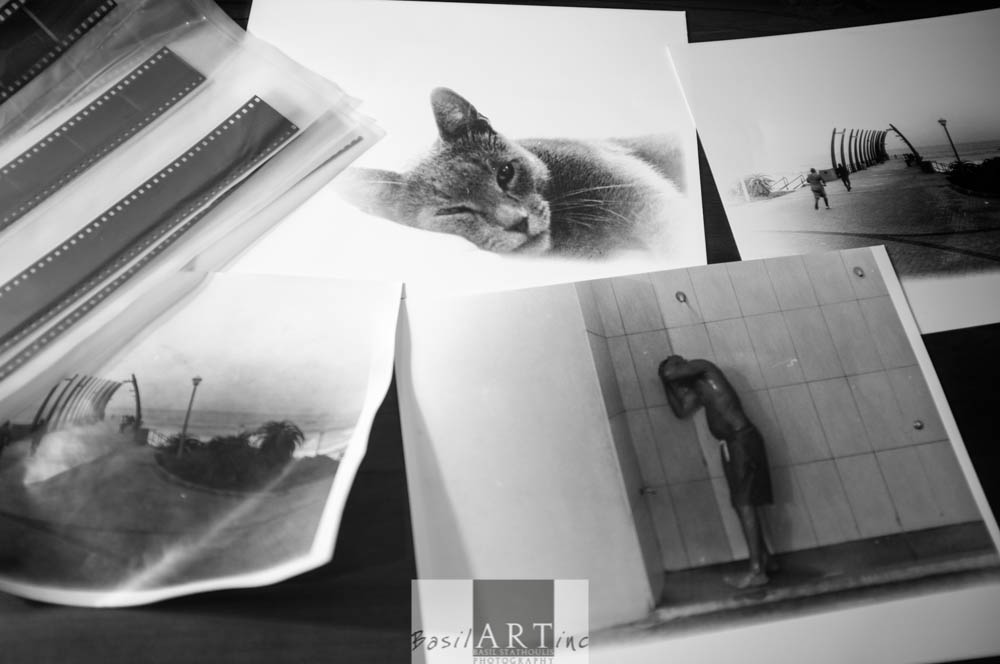
Classic equipment in original boxes with manuals
Using the Durst “Made in Germany” mechanical timer and Mike as a time keeper, I poured the developer into the tank like a celebratory glass of champagne and agitated the mix every minute until I poured that out and poured in the stop to cease the developing process. Then a few minutes in the fix, and after the first wash, I opened the tank lid and peeped at the negatives. My heart sank initially as I had exposed Mike’s film by opening the camera back as we had forgotten how to rewind the film in his “automatic” Minolta 500i. The OM1 was much easier with a manual rewind lever. But the negatives looked alight.
I used dishwasher rinse as a wetting agent, then dried the film with a chamois, as I only had an old squeegee that would scratch the film because the rubber had perished. Ivor had sent original film hanging clips so we left them to dry in the shower and had lunch.
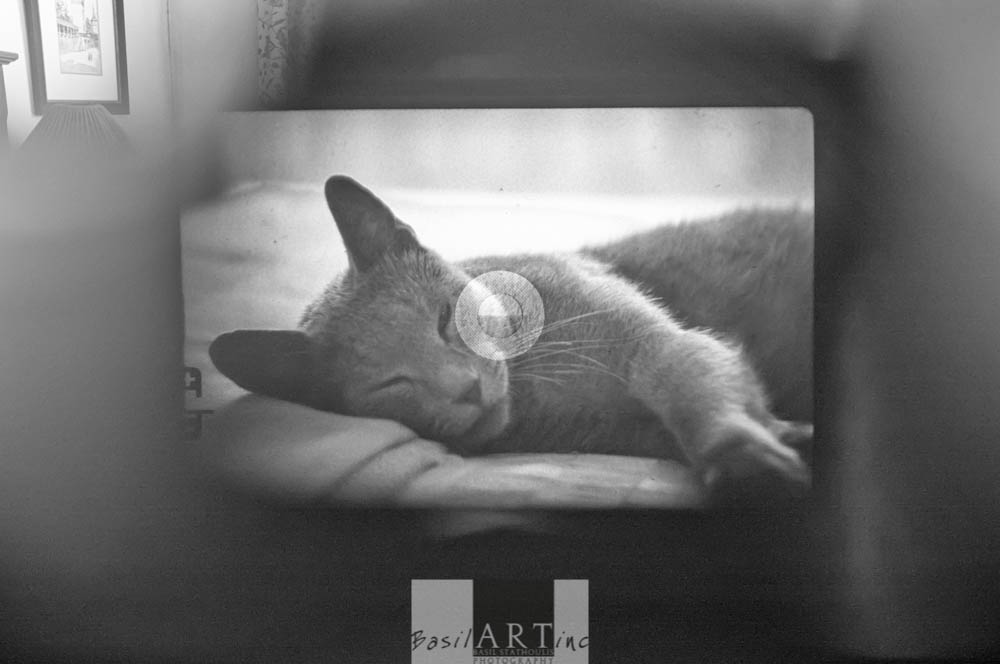
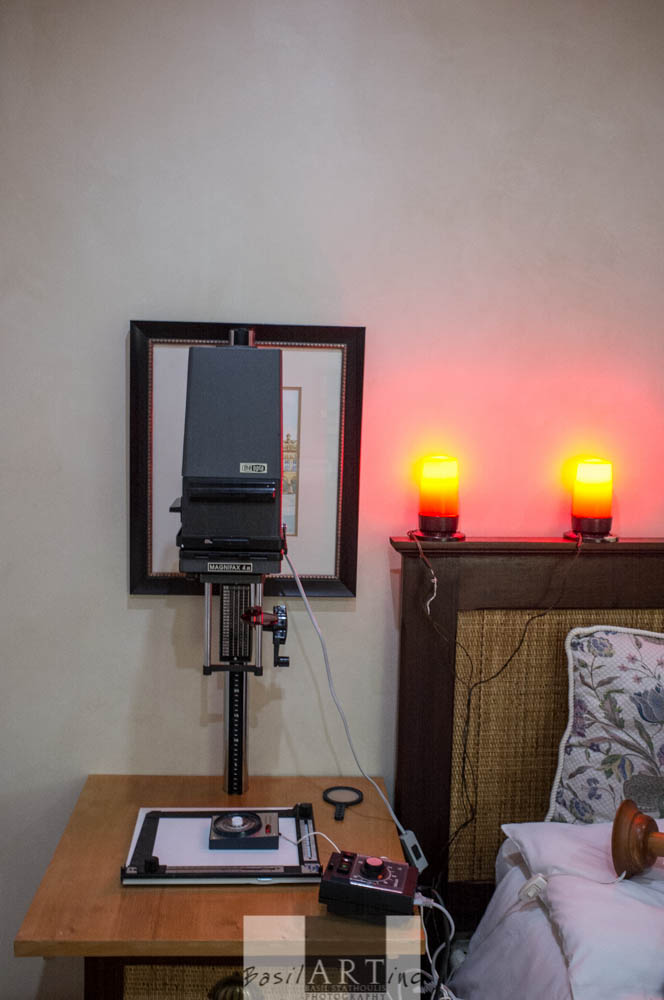
After lunch I set up the spare room as darkroom. I placed the Meopta enlarger and timer and the Patterson enlarging “computer” ( just a simple exposure meter) on a table. After a few test prints, as I had no idea of what time to use, we found some images appearing. When I changed the enlarger bulb to a full 150 Watt light things really started happening. Ivor had sent some old (from the fifties or sixties) Agfa Bronica paper. This was not a resin paper and dried badly without a proper drier or press. Then we started using the Ilford Mutilgrade resin paper and my first picture was born.
The equipment was working well enough to plan a darkroom party at Costa Calla.
Olympus OM-1 with remote shutter release on a tripod
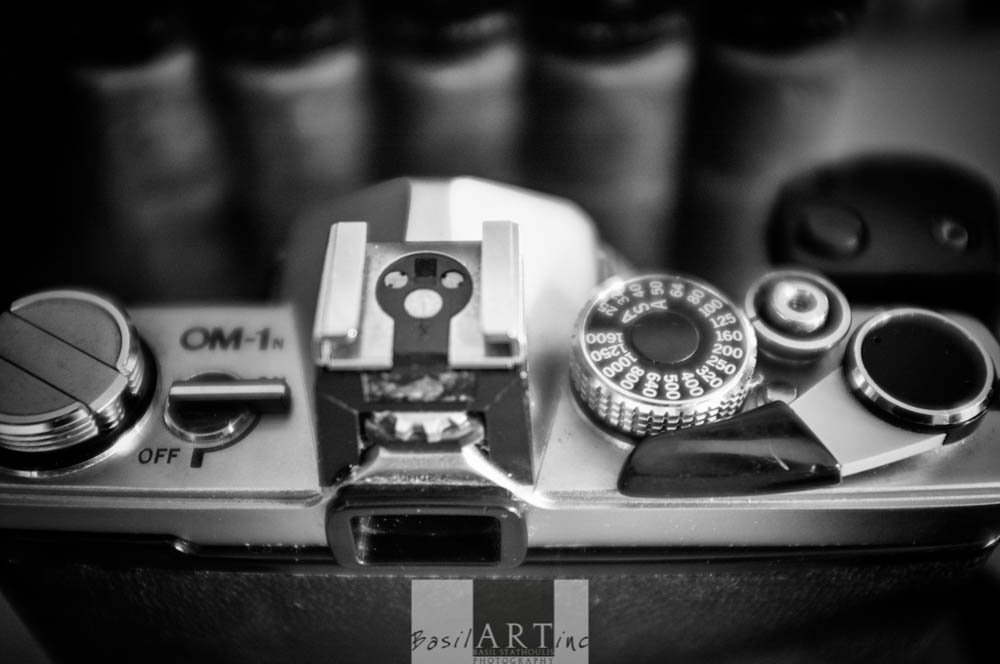
My camera needed new batteries and the film had to be loaded manually. There were a lot of reassuring levers, clicks and mechanical confirmation sounds. My motor winder missed the engage occasionally and just spun. But the manual winder on top of the camera still worked.
I had replaced the small hearing aid type battery, which operates the light meter. The response of the light meter seemed dulled so I had to check it with the Light Metter App I have loaded on my iPhone. That worked a charm. The Olympus OM 1 has an On/Off switch, an ASA ring from 50 to 1600 ISO, a film winder, shutter release button, film release button, self timer and a flash hotshoe. The interchangeable lens has the shutter speed ring at its base, with the aperture ring in the front. That’s it! Oh, and as far as I remember the battery would last a few years. Simple but beautiful!
I opened box of film and unplugged the canister. I had forgotten about the celluloid smell.The cartridge fell into my hands and I loaded the camera easily, checking the drag to ensure it was running and loading just the tip to get an extra frame out of the roll of 36 exposures.
The OM1 is a small camera. The Zuiko optics are great. The viewfinder is tiny and dark especially with an f 4.0 lens. The focusing screen has a central twin prism surrounded by a circle of smaller prisms and then the ground glass. I have another focusing screen that I can insert (yes, they were interchangeable) that is an open circle and ground glass much like the ones in most DSLRs today. There is no diopter adjustment on the viewfinder, so I had to look through my glasses to see.
Through the (small) viewfinder of the Olympus OM-1 – note the split prism to assist in focussing.
I took a few pictures around the house with an ISO of 125. I had to use the tripod, and also think about the picture I wanted, then check the light reading with my external light meter.
The beach was more fun. I felt that I had been transported in a time machine and had arrived 40 years earlier, taking pictures the old fashioned way. I only took about 30 at the beach, though a whole lot more than normal and enjoyed looking at the light, the light meter and caressing my camera.
Janvier and I did capture a proposal at the end of the pier. How lucky are that couple to have their special moment captured on celluloid in 2014?
A couple on the pier: he proposed to her…. ( negative processed in Lightroom)
A few weeks ago a plan came together that had been hatched four years ago.
I made a major challenge to myself, but hedged my bets. The challenge was to embrace modern digital DLSR technology, so I bought camera equipment that performs far better than I make pictures.
But I hedged my bets by purchasing some second hand Zuiko lenses for my Olympus OM1. They cost a fraction of what my new lenses did, and weighed only a fraction as well. I had to because about 15 years ago we had a robbery at home where I lost most of that kit, and all I was left with was an OM1 body and motor winder.
I hedged my bets because if the digital experiment failed, then I would go back to film.
Digital photography has not failed me. I have learnt so much and have so much more to learn, and have made pictures that make me smile.
The equipment from Ivor Ginsberg arrived in three boxes
However, roots are important. In life and in photography. I trawled the Internet for darkroom equipment: like everyone else I asked, I had given my darkroom equipment away. By a stroke of luck I found Ivor Ginsberg’s contact details on one of the smalls of a site and left a message on his mobile. He called back a few days later and three weeks later I collected 44 kilograms of darkroom equipment from the freight office at King Shaka Zulu airport. I had a large Meopta enlarger, 3 lenses, timers, exposure meters, safe lights, trays, developing tanks, measuring cylinders and some old Agfa Bromide Paper.
For modern film and paper I had been told about Photomax in Durban, so on the way to collect Ivor’s delivery I stopped by and bought Ilford film, paper, developers and fixer. Later I bought a contact print device there as well.
The next day I unpacked Ivor’s boxes. An original Durst Timer, in the box with instructions. Made in
Classic equipment in original boxes with manuals
Germany. A Paterson Exposure “Computer” in the box, with the instruction manual. Made in England. The Meopta enlarger in its original cardboard box. Made in Czechoslovakia. Like the timer.
I stored the film, paper and chemicals in the fridge. I had to look up equivalents for Stop (used vinegar to make up a solution of 1.5% ascetic acid) and dishwasher rinse aid as a wetting agent.
I cleaned my lenses and camera. Ines tolerated the spare room beginning to look (and smell) like a darkroom.
It was time to mix the chemicals, black out the darkroom and take some film pictures!
A digital picture that makes me smile: Humpback diving in front of a glacier wall
BLACK AND WHITE SPIDER AWARDS HONORS PHOTOGRAPHER basilARTinc – BASIL STATHOULIS FROM SOUTH AFRICA
LONDON 21 October 2013 – Amateur photographer Basil Stathoulis of South Africa was presented with the 8th Annual Black and White Spider Awards Nominee in the category of Wildlife at a prestigious Nomination & Winners PhotoShow. The live online ceremony webcast Saturday, October 19, 2013 was attended by photography fans in 75 countries who logged on to see the climax of the industry’s most important event for black and white photography.
The awards international Jury included captains of the industry from the Tate in London, Heffel Fine Art, FoMu Fotomuseum, FTM Advisory, Camera Work, Art Stage Singapore, Aeroplastics Contemporary, Galerie Baudoin Lebon in Paris, to Fratelli Alinari in Florence who honored Spider Fellows with 246 coveted title awards and 938 nominees in 14 categories.
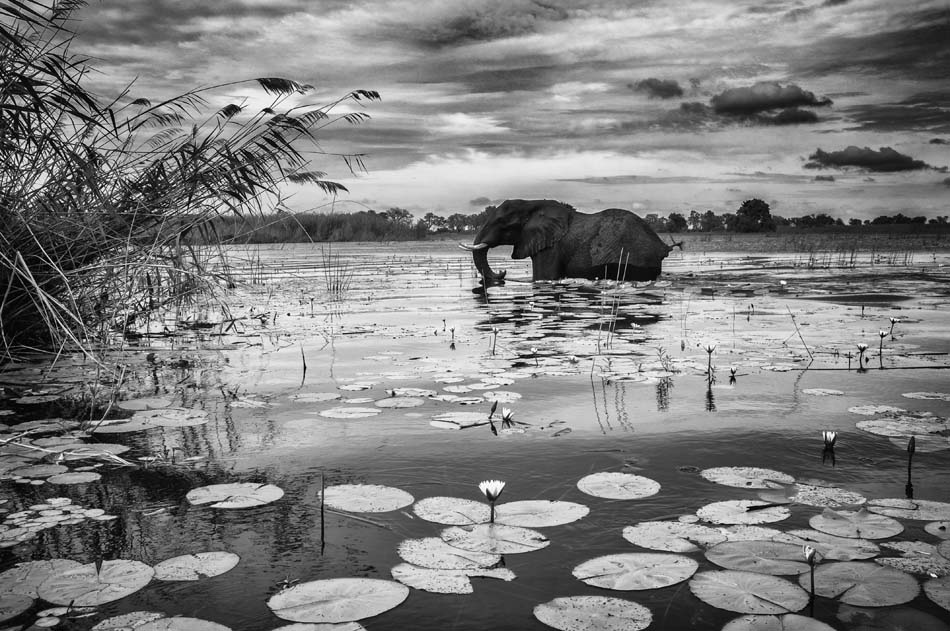
“It is an incredible achievement to be selected among the best from the 9,456 entries we received this year,” said Basil O’Brien, the awards Creative Director. “Basil Stathoulis’s “Elephant crossing waterlilies,” an exceptional image entered in the Wildlife category, represents black and white photography at its finest, and we’re pleased to present him with the title of Nominee.”
BLACK AND WHITE SPIDER AWARDS is the leading international award honoring excellence in black and white photography. This celebrated event shines a spotlight on the best professional and amateur photographers worldwide and honors the finest images with the highest achievements in black and white photography.
Life is interesting. Last year I bought a Fuji Digital camera that I almost exclusively shoot in black and white.
Thirty years ago I used to love shooting Fujicolor, enriching my visual life much more than Paul Simon’s Kodachrome.
This year Anita de Villiers introduced me to a simple way of blending on Photoshop that gives me my Fujicolor effect again.
It all started with the information that the human eye can see 16 f-stops of light while the humble digital sensor can only see 5 f-stops. This is quite fundamental to digital photography, and why some great photographers still shoot transparencies that are scanned into Photoshop for gorgeous processing. Nick Brandt, for example.
This f-stop limit of the digital sensor is as important as why you should shoot in RAW. The good thing is if you have followed nothing of my paper so far, you can still do all of this with bracketed JPEG pictures.
Fujicolor slide film had an amazing range of light and dark capture. My latest and greatest digital sensor (the camera of which is now in for repairs / replacement after a drowning incident in the ocean) can only do that with bracketing.
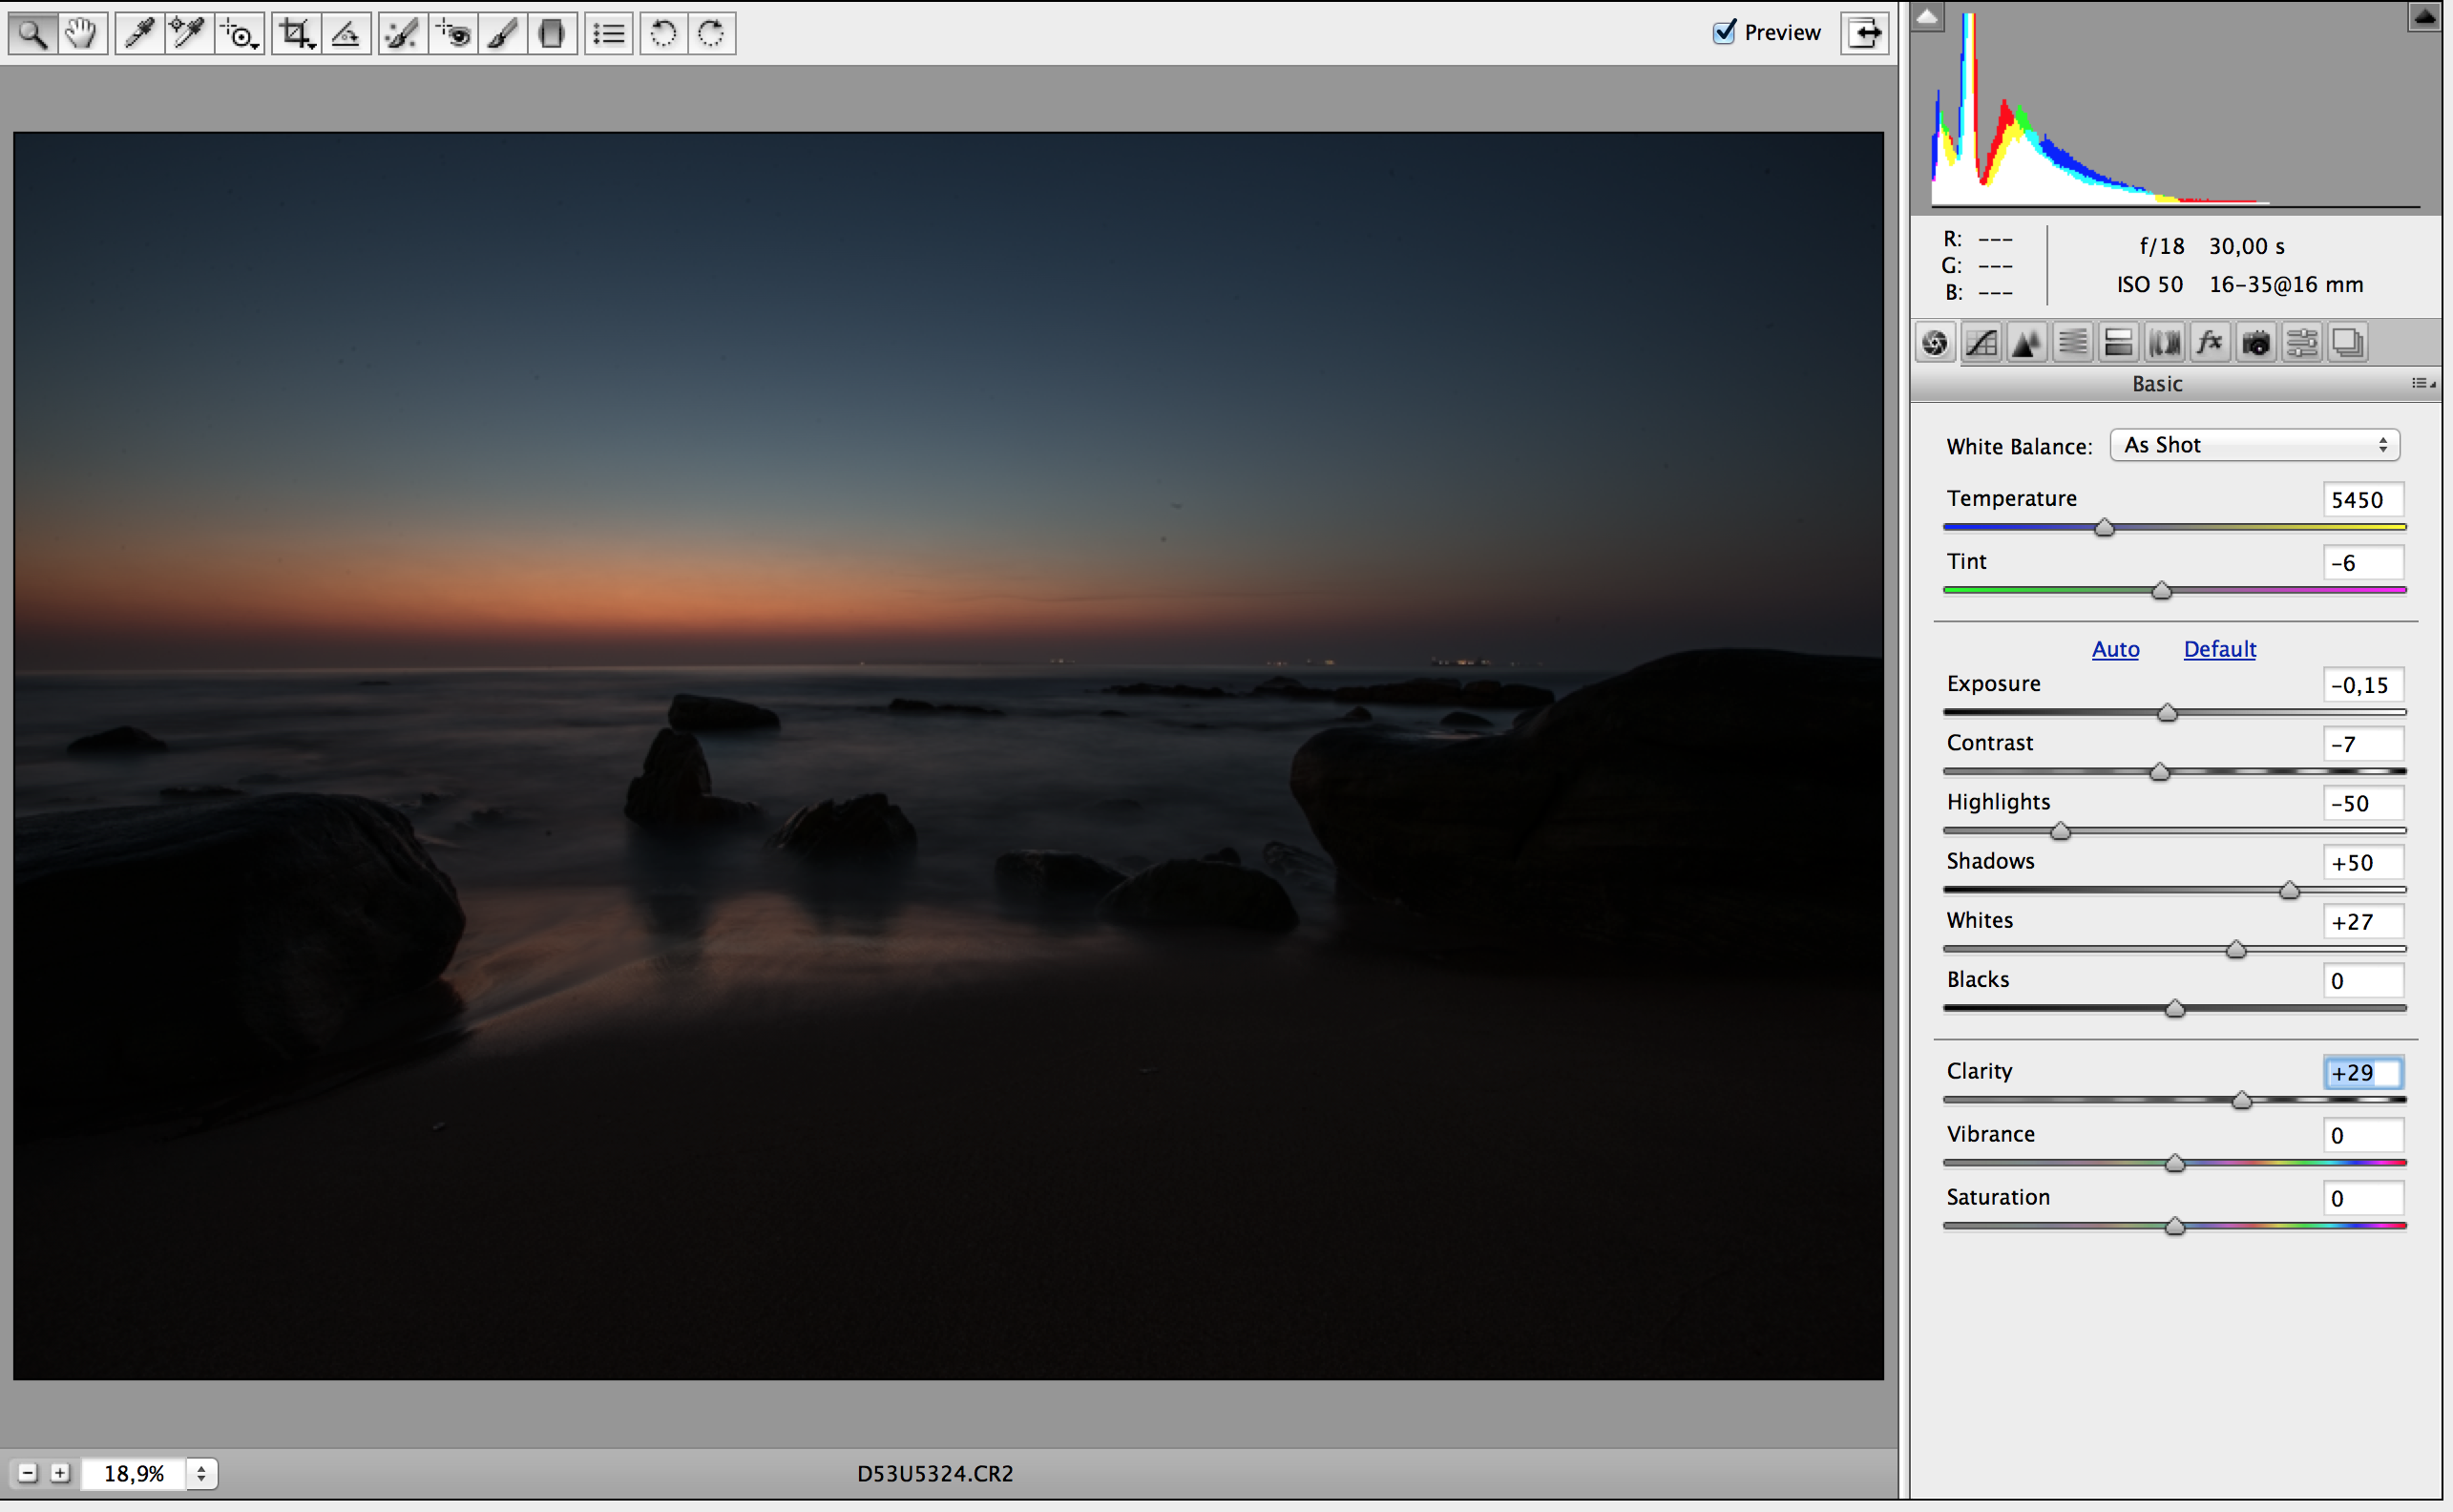
So when I am shooting a landscape of extremes I bracket twice: once for the foreground and once for the sky. Then I blend them. The exposure is based on a neutral area and then treating the mids and lows histogram as one and the highs histogram as another. So my two exposures would look like this on the histogram:
If you have not bracketed then you can easily recover two pictures from a RAW file like this and blend them.
This is the original RAW file:
and this is my sky exposure:
and my foreground exposure:
Notice how I ignored the blowouts on the sky and pushed the exposure and shadows up, and increased the blacks a bit.
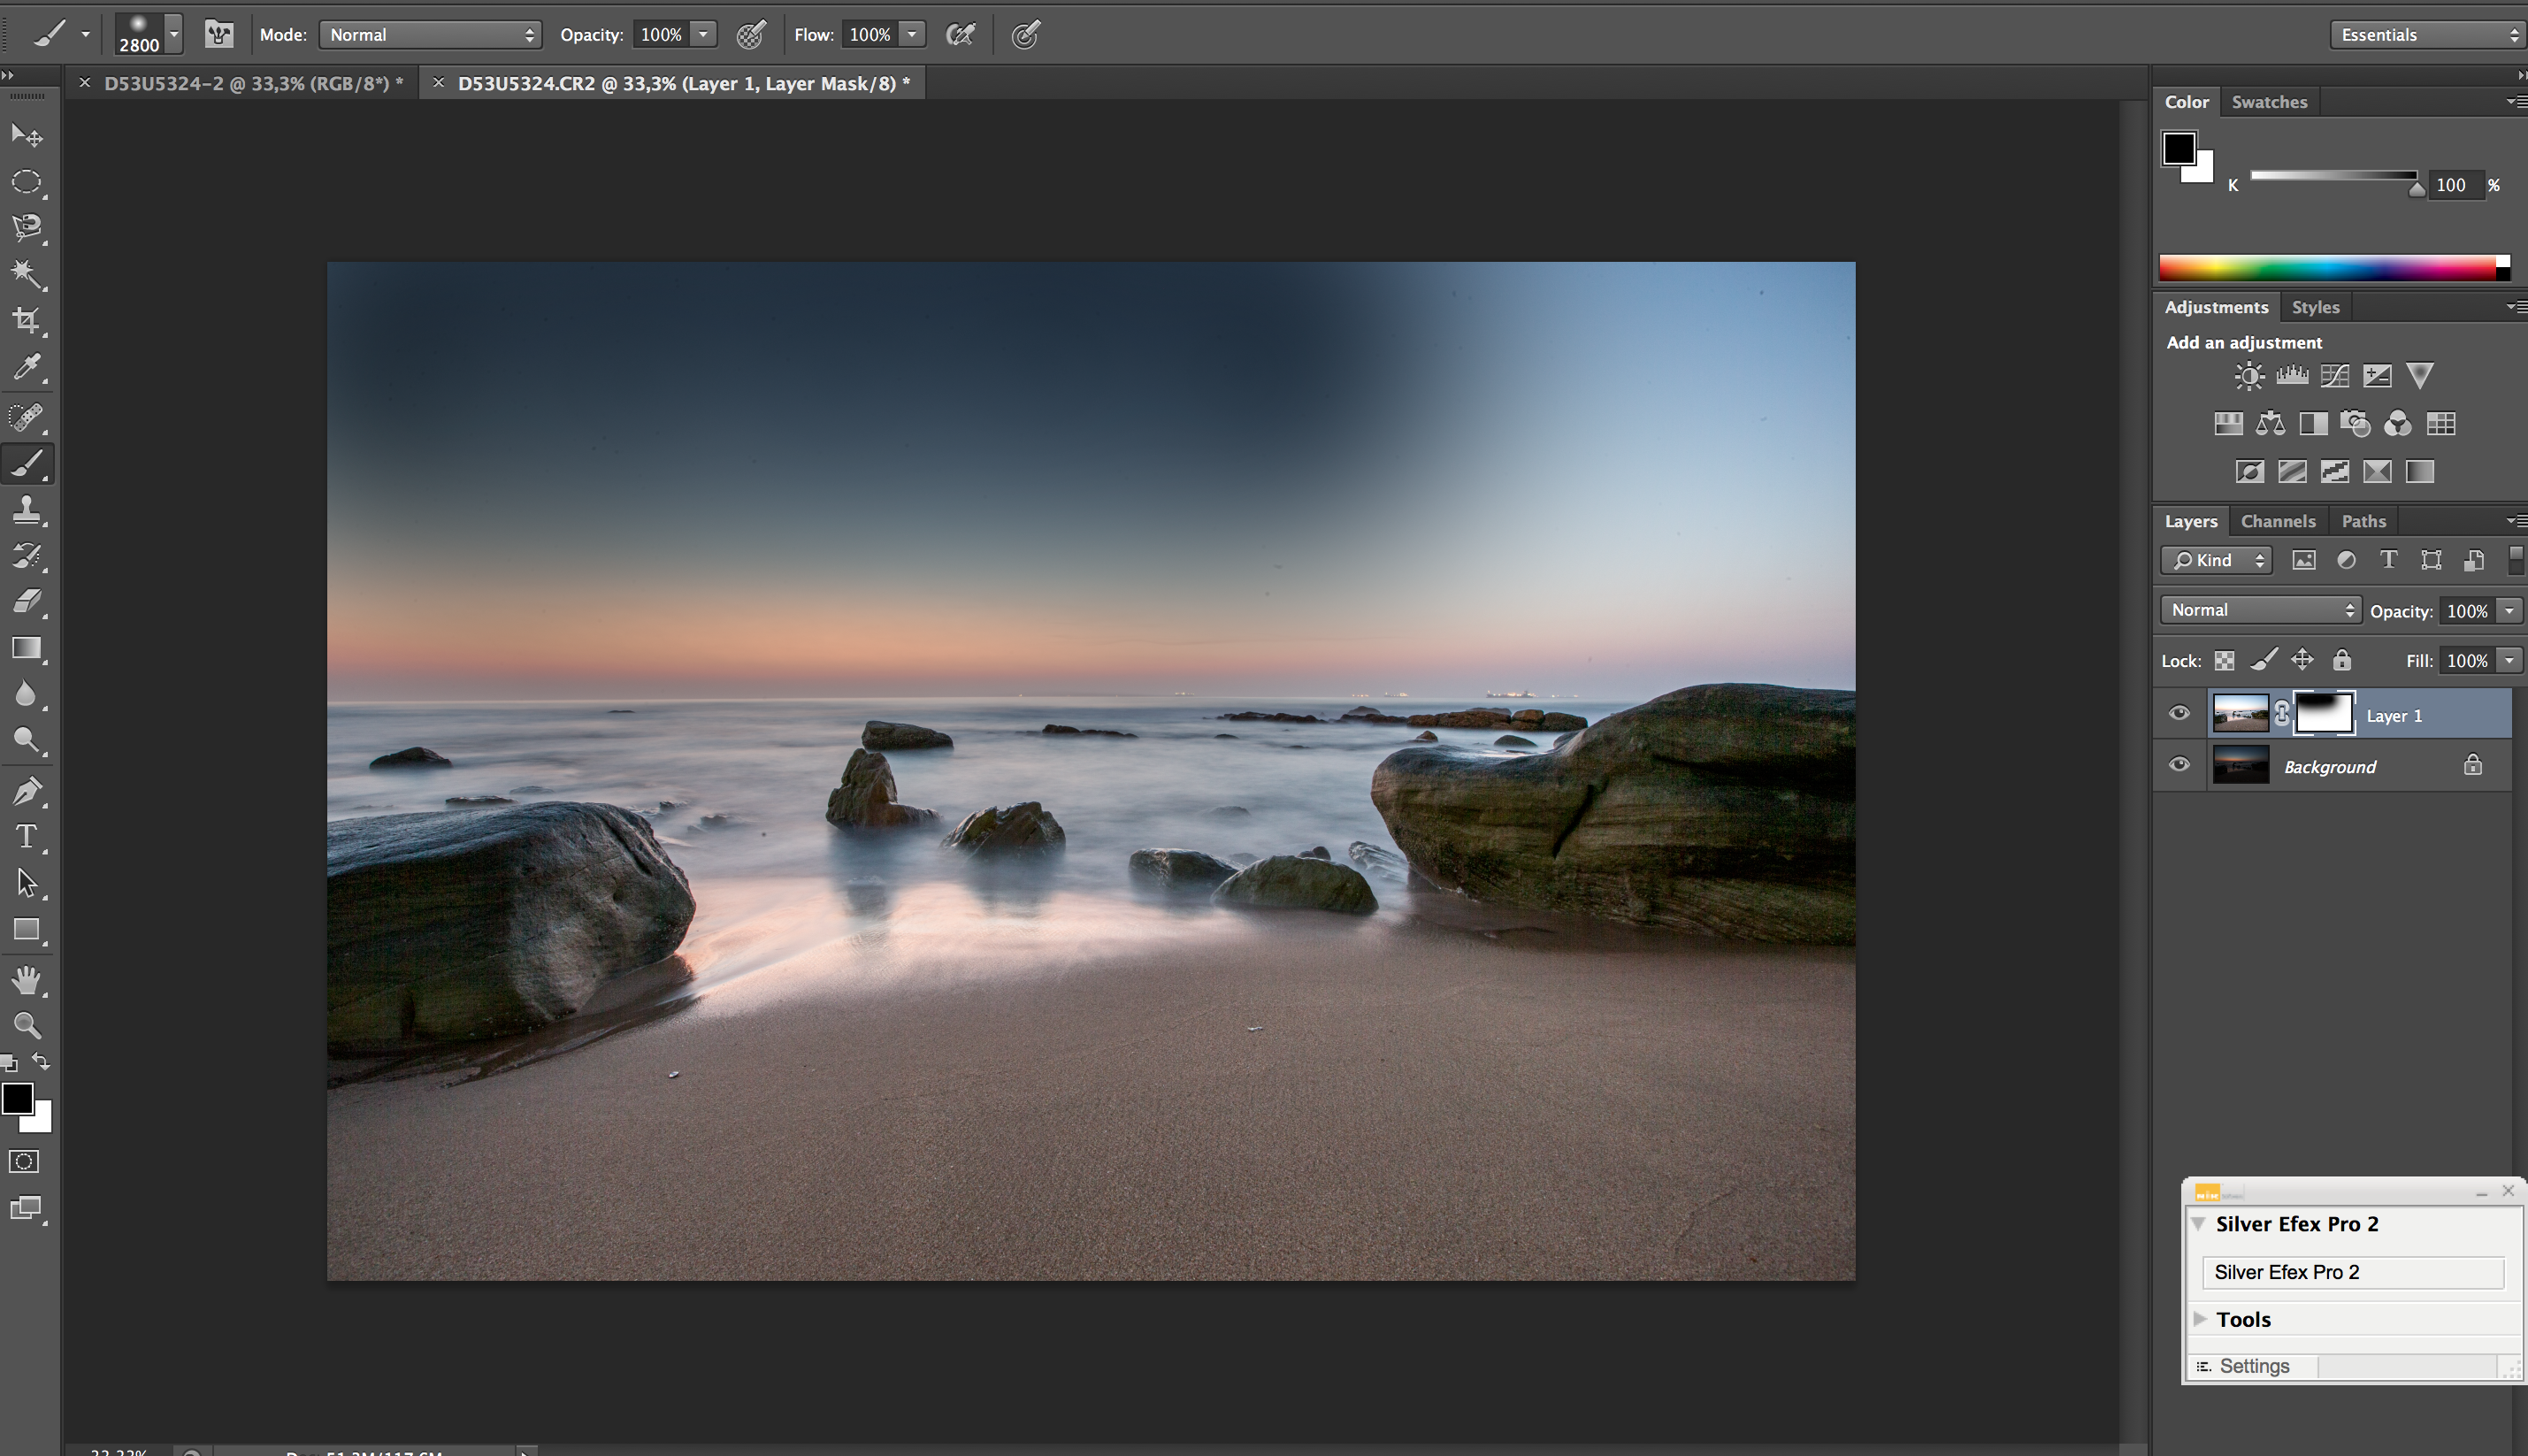
Then I open both of these in Photoshop and I copy one and paste it on the other. The shortcut is cmd A cmd C the cmd V to paste. It will look like this in Photoshop:
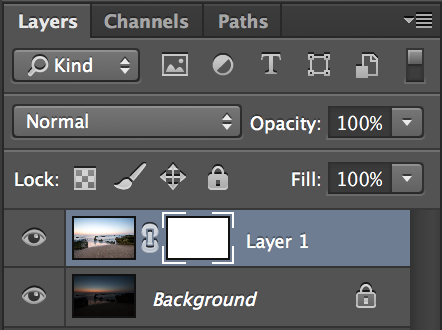
Notice the foreground exposure is Layer1 – add a layer mask to this. Sky exposure is the Background.
This shows the Layer mask on Layer1:
Then take a black brush Opacity set at 100% and paint over the sky:
In this case I have painted from left to right and still have to paint the right upper quarter.
Once completed I do levels again and sharpen as normal.
I remember working for my father when I was still at school. My jobs were always to file in his office.
“It’s easy to file. The hard part is to find something after you’ve filed it” he would say. That was way before computers. Now we all drop files into our hard drives and hope we can find them again.
At the outset, the best thing is to tag your pictures using keywords on the metadata. Then it’s easy to find the pictures you want. But if you do not tag consistently then you must file properly. I have been using digital cameras since 2000. The quality was shocking but I still have those pictures. I have also subsequently scanned all my photographs and slides into separate folders.
One of the best tips I received was to make a folder on my computer and call it MY DIGITAL PHOTOS.
My Digital Photos
Computers tend to save all pictures you save from emails and the web into My Pictures. So if you create MY DIGITAL PHOTOS it is just that. Then I have a folder for each year:
All my photos, year by year
I always transfer my pictures from the camera card to the computer by manually selecting the pictures ( Ctrl A) and copying (Ctrl C) before pasting (Ctrl V) into a folder. I then back the folder up on an external drive before formatting the card in the camera.
So now it’s 2013 and I have high quality large size files and I work like this. For every shoot I do I label the folder with the date first in to format ccyymmdd followed by AM or PM if I am shooting all day followed by the camera I use followed by Keywords for the shoot. So it looks like this:
Labelling by date, AM or PM and camera with key words
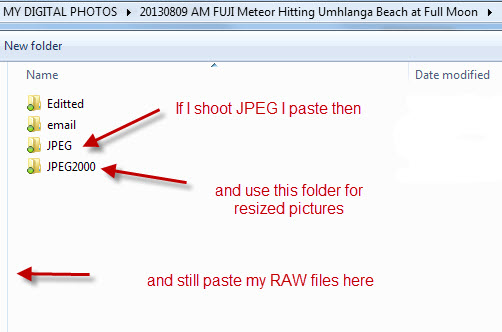
Before I used to create the folders new each time; now I prepare proforma folders the way I like them. I set up each folder with the following subfolders: Editted, JPEG and email. I then make copies of these proformas (or blanks) and rename them when needed. I sue “Editted” to save Photoshop files of the pictures I am working on, JPEG for 2000×2000 pixel pictures for screen showing and email for 900×900 pixel pictures to email and post on the web. More about how I resize later. I shoot RAW only except for things like weddings and parties, and then I leave the RAW files in the main folder and put the JPEGs into the “JPEG” Folder. Sometimes I create another subfolder JPEG2000 for the screen showing versions.
When I do a shoot I just rename the folder and paste the RAW files into it. So MY DIGITAL PHOTOS looks like this:
Blank proformas
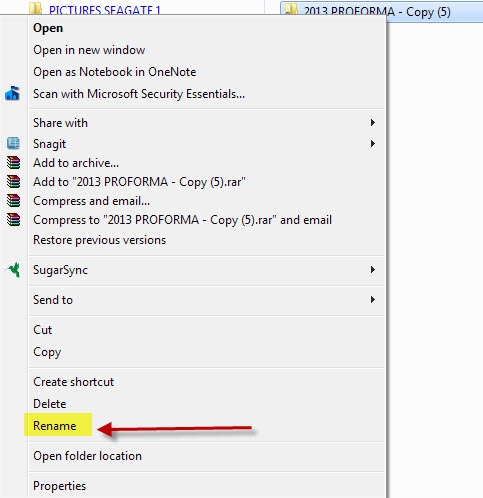
To rename I right click on one of the proformas (I choose the highest number and work back) and rename it:
Renaming a proforma folder
So it looks like this:
The renamed folder highlighted
So I open that file and paste the RAW files into the folder. If you Just shoot JPEG then file them here too. If you shoot JPEG and RAW then drop them all here, or separate the JPEGS into the JPEG folder. The RAW files remain adjusted but unchanged, i.e. you can open them and return the settings to as shot without losing any data. If you open a JPEG and save it then the file degrades. After about 12 openings you will see loss of integrity.
Copying RAW or JPEGS to this folderSaving edited and resized pictures
Once I work on a RAW file I save the Photoshop Document (PSD) to the edited folder. From there it is easy to resize in batches and save to the relevant folder.
When I do a big trip with morning and afternoon shoots I put them all in a folder with the start date of that trip, as there can be 15 to 20 subfolders in these. So it will look like this:
One folder with many shoots on a trip
And when you open it, it looks like this:
A portfolio folder for the shoot
When I am on a big trip I then copy the edited files from each morning or days shoot onto a newly created Portfolio file and then resize in that folder, so my Portfolio for the above looks like this:
Inside the portfolio file: edited, JPEG and email sizes
It is useful to create an evaluation folder for each day when on workshops and I use it similarly to the portfolio folder:
For each year I also like some special folders such as for all the Best Edited, Competitions and any monthly meetings.
Other categories for annual folders
Once I have created a folder I back it up onto an external drive. Once it is backed up onto a second external drive I delete the folder from my computer, as I have a tiny hard drive on my MacBook and huge photo files. I use a program called Goodsync to synchronise changes in folders if I edit any pictures after the backup has been made.
Remember to do what you do consistently and back up. That way you will find the pictures you want forever.
 It was a hot and humid day in Durban and I loaded the film into the reels and developing tank in a small windowless and airless room under the steps at home. Then I set about the chemistry of mixing the DF11 Ilford film developer, a homemade stop with vinegar and the Ilford fixer. The temperature of the developer is critical and fortunately Ivor Ginsberg had sent me a thermometer that fitted in the irrigation spout of the developing tank.